
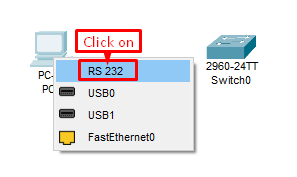
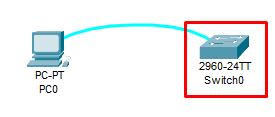
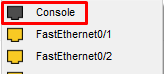
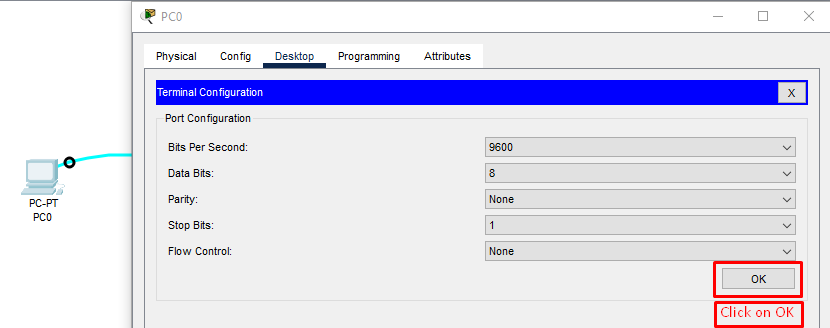
Connect the PC to the Switch through the Console Cable
Select console cable>Click on RS 232 >Click on Switch>Select Console. After that, we can access the switch terminal from a PC through a console cable via Remote Access via SSH (Port-22) or Telnet (Port-23)
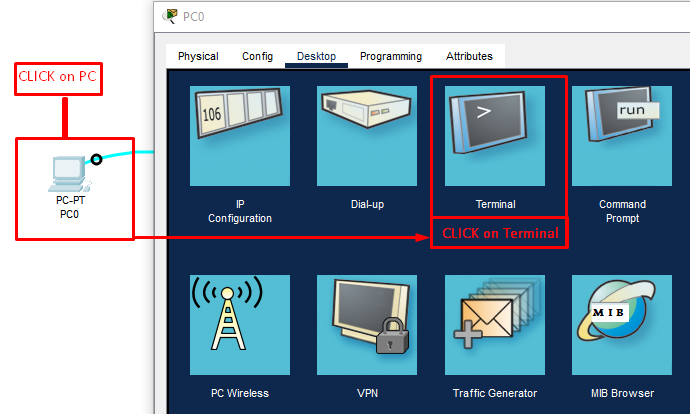
Opening the Switch CLI from a PC terminal

Navigating User Levels
Switch has 3 different Command Line Interface (CLI) modes:
1. User EXEC Mode: Switch>
2. Privileged EXEC Mode: Switch#
3. Global Configuration Mode: Switch (config)#
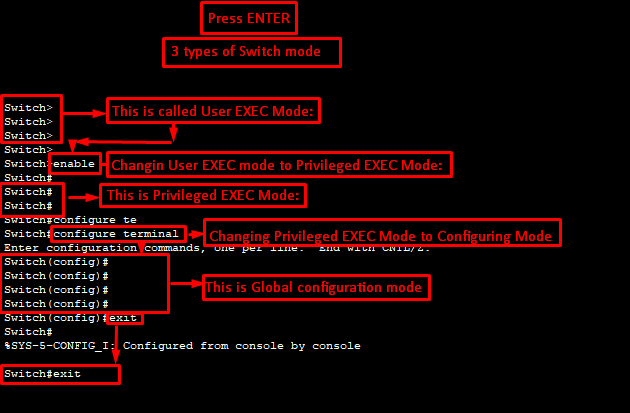
Switch>
Switch>
Switch>
Switch>
Switch>enable ———————–(short form cmd – en)
Switch#
Switch#
Switch#configure terminal —-(short form cmd – conf t)
Enter configuration commands, one per line. End with CNTL/Z.
Switch(config)#
Switch(config)#
Switch(config)#
Switch(config)#
Switch(config)#exit
Switch#
%SYS-5-CONFIG_I: Configured from console by console
Switch#exit
Host Name change:
First Change the CLI mode:- User EXEC mode>Privileged EXEC Mode>Global Config mode
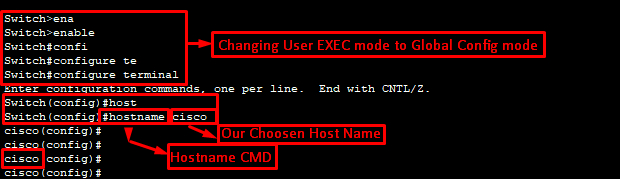
Host Name change command:
Switch>enable
Switch#configure terminal
Switch(config)#hostname cisco
cisco(config)#
cisco(config)#
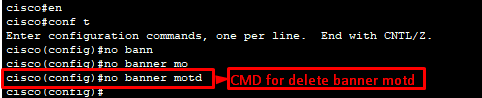
Banner MOTD (message of the day) change:
The banner motd (message of the day) is a customized message displayed to users attempting to connect to a Cisco IOS device, such as a router or switch. It is the first message a user sees before the login prompt, making it useful for providing general, temporary announcements to anyone trying to access the device. Banner MOTD message will start & end with “#” sign


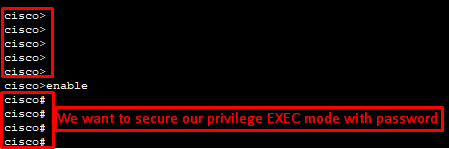
PASSWORD & ENCRYPTION
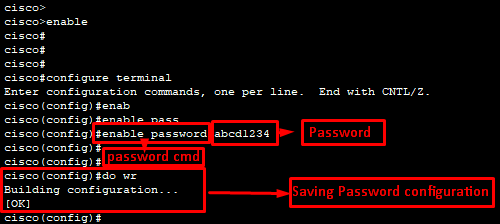
Enabling password to secure Privileged EXEC Mode:
To secure Privileged EXEC Mode / Switch# mode, we can use a Password.

Console Configuration
(User, Password, Login, Logging time out, Prevent unwanted system notification)
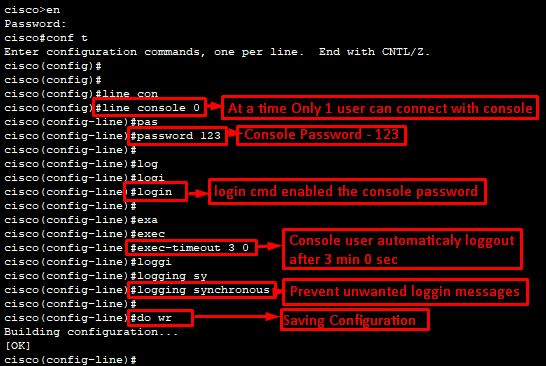
Console Configuration Command:
cisco>en
Password:
cisco#conf t
cisco(config)#line console 0
cisco(config-line)#password 123
cisco(config-line)#login
cisco(config-line)#exec-timeout 3 0
cisco(config-line)#logging synchronous
cisco(config-line)#do wr
Building configuration…
[OK]
After 3 minutes console user automatically logged out. When we want to log in again, it requires a password:-
User Access Verification
Password:
cisco>enable
Password:
cisco#conf t
Enter configuration commands, one per line. End with CNTL/Z.
cisco(config)#
Console Configuration Command in Brief:-
| CMD | Brief Instruction |
| line console 0 | # Enters line configuration mode for the console line (0 is the only console line). # This is where you configure console access settings. |
| password cisco | # Sets the password for accessing the console line. # In this case, the console password is cisco. |
| login | # Tells the device to require the user to enter the console password before gaining access. #Without this, the password would be set but not enforced. |
| exec-timeout 3 0 | # exec-timeout 3 0 # Sets the console session idle timeout. # Syntax: exec-timeout <minutes> <seconds> #Here it is set to 3 minutes 0 seconds. # If there is no input for 3 minutes, the console session is automatically logged out. |
| logging synchronous | # Ensures that log messages (like system notifications) don’t interrupt your typing on the console. # Without it, log messages can appear in the middle of your commands, which is annoying. # With it, log messages appear on a new line after your command. |
| do wr | # executes write memory while still in config mode. # Equivalent to copy running-config startup-config. |
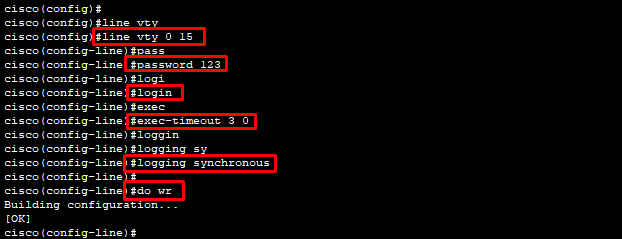
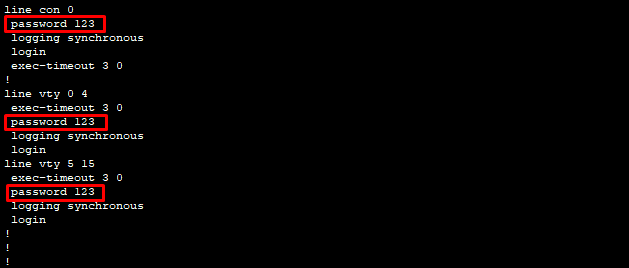
Line VTY Configuration
Cisco network device, likely a router or a switch, to configure its virtual terminal (VTY) lines. VTY lines are used for remote administrative access, like through Telnet or SSH.
cisco(config)#
cisco(config)#line vty 0 15
cisco(config-line)#password 123
cisco(config-line)#login
cisco(config-line)#exec-timeout 3 0
cisco(config-line)#logging synchronous
cisco(config-line)#do wr
Building configuration…
[OK]
Line Vty Commands in brief:
VTY (Virtual Teletype) lines, which are used for remote access (Telnet/SSH) on a Cisco device.
| CMD | Brief Instruction |
| line vty 0 15 | # Enters VTY line configuration mode for lines 0 through 15. # Cisco devices usually have 16 VTY lines (numbered 0–15). # These are used when connecting remotely via Telnet or SSH. |
| password cisco | # Sets the password for Telnet/SSH access on those VTY lines. # In this case, the console password is 123. |
| login | # Tells the device to prompt for the password when someone tries to log in through Telnet/SSH. # Without this, the password won’t be used. |
| exec-timeout 3 0 | # Sets the idle timeout for VTY sessions. # Here: 3 minutes, 0 seconds. # If a remote session is idle for 3 minutes, it will automatically disconnect. |
| logging synchronous | # Makes system messages (like logs or debug output) appear on a new line instead of interrupting what the user is typing in the remote session. # This improves readability and usability. |
| do wr | # This is a shortcut command. The full command is do write memory, and it’s used to save the running configuration (the changes you just made) to the startup configuration. The startup configuration is what the device uses when it boots up. If you don’t save the configuration with this command, all your changes will be lost the next time the device is rebooted. # Equivalent to copy running-config startup-config. |
Disable IP Domain Lookup:

IP Domain Name

Commands:
cisco(config)#
cisco(config)#no ip domain lookup
cisco(config)#ip domain name cisco.com
Commands in brief:
The command no ip domain-lookup on a Cisco device disables the automatic DNS lookup for incorrectly typed commands
| CMD | Brief Instruction |
| no ip domain-lookup | # These commands disable the DNS lookup feature. By default, Cisco IOS attempts to translate any unknown command that you type into a hostname and then tries to resolve it using DNS. This can cause a delay of several seconds as the device waits for a DNS server response, which can be frustrating during a configuration session. Using no ip domain lookup turns off this behavior. |
| ip domain-name cisco.com | # This command sets the default domain name for the device. When you try to connect to a host using just its hostname (e.g., router1), the device will append the configured domain name to it (e.g., router1.cisco.com) and then attempt to resolve the fully qualified domain name (FQDN) using DNS. This saves you from having to type the full domain name for every connection. |
Create a new user
User Name & Password set

Commands:
cisco(config)#username Admin password cisco
Commands in brief:
Cisco IOS command for creating a local user account on a network device. This command is used to set up a local database of usernames and passwords on the device itself. This is a common practice for securing access, especially when using authentication methods like SSH or AAA (Authentication, Authorization, and Accounting). It allows an administrator to log in with a specific username and password instead of relying on a shared enable password or a VTY line password.
| CMD | Brief Instruction |
| username Admin | # This part specifies the username for the new account, which is Admin. |
| password cisco | # This sets the password for the Admin user to cisco. |
Encrypt All Passwords
Cisco encrypts passwords to protect them from being easily read if the device’s configuration file is accessed by an unauthorized person, which prevents simple snooping or casual theft. While not always a foolproof measure against advanced cracking attempts, encryption scrambles passwords into unreadable code, making them useless to anyone without the proper key and significantly enhancing the device’s security posture.
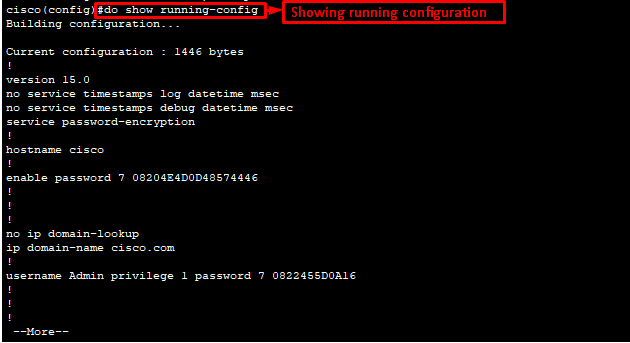
Let’s check our running configuration in Cisco switch
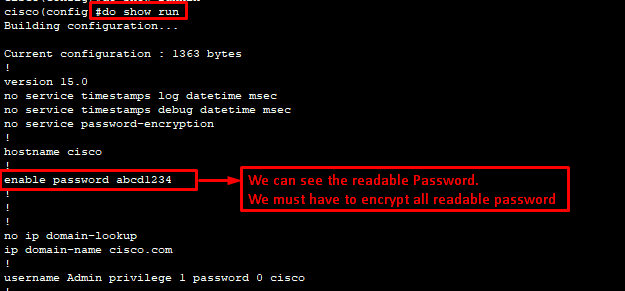
Let’s encrypt all passwords:

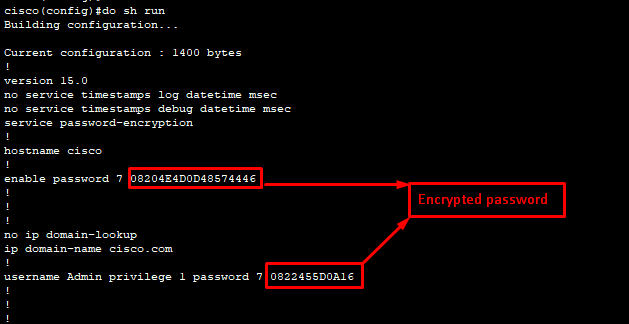
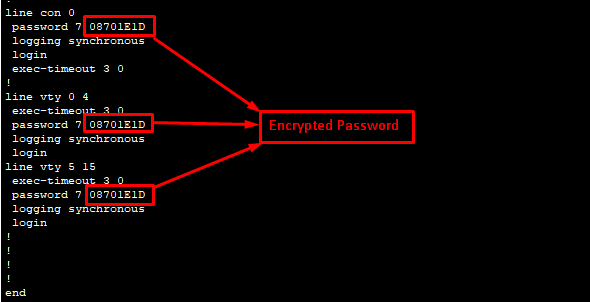
Password encryption CMD:
cisco(config)#service password-encryption
cisco(config)#do sh run
| CMD | Brief Instruction |
| service password-encryption | # This command enables a weak form of password encryption on the device. # Purpose: Cisco IOS stores passwords, such as those set with the password or enable password commands, in plaintext (unencrypted) in the running and startup configurations. Anyone with access to the configuration file could easily read these passwords. # By using the service password-encryption command, the device encrypts these plaintext passwords using a simple, reversible algorithm (a type 7 encryption). This makes it harder for someone to view the passwords at a glance, improving security by obfuscating them from casual observers. |
| do show running-config | # The correct command is do show running-config, often abbreviated as do sh run. # This command displays the running configuration of the device. The running configuration is the set of commands and settings currently active in the device’s RAM (Random Access Memory). Think of it as the device’s current, active instructions. |
Set Clock time:
To set the Clock Time, we have to enter the Privileged EXEC Mode, Then Log in to the device and enter enable to access privileged mode.
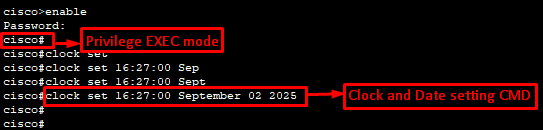
Clock set CMD:
cisco>enable
Password:
cisco#
cisco#clock set 16:27:00 September 02 2025
Commands in brief:
| CMD | Brief Instruction |
| clock set 16:27:00 September 02 2025 | # cisco#: This indicates that the command is executed from privileged EXEC mode. You can’t use this command from a lower privilege level, like user EXEC mode or global configuration mode. # clock set: This is the command itself, which initiates the process of manually setting the device’s clock. # 16:27:00: This part sets the time in 24-hour format (HH:MM:SS), specifying 4:27 PM and 0 seconds. # September 02 2025: This part sets the date, specifying the month, day, and year. The month is usually entered as a full name or a three-letter abbreviation (e.g., Sep or September). |
Set Management IP:
The primary purpose of a management IP address on a Cisco switch is to provide a dedicated, accessible address for administrators to remotely configure, monitor, and troubleshoot the switch using protocols like Telnet, SSH, or SNMP, separate from the switch’s normal data traffic. This allows for efficient network management and improves security by isolating management functions from the core data plane. It is a common sequence of commands to configure a management IP address on a Cisco switch. Since a typical Layer 2 switch operates at Layer 2 (data link layer), it doesn’t have an IP address for its physical interfaces. To manage it remotely via protocols like Telnet or SSH, you must assign an IP address to a logical interface called a Switched Virtual Interface (SVI), which is the interface vlan 1.
How It Works:
# The management IP address is typically assigned to a dedicated VLAN interface, like the default VLAN 1, on the switch.
#To access the switch, an administrator uses management software to connect to this specific IP address, enabling remote control over the switch’s operations.
Management IP setting Process:
First, we have to enable global configuration mode
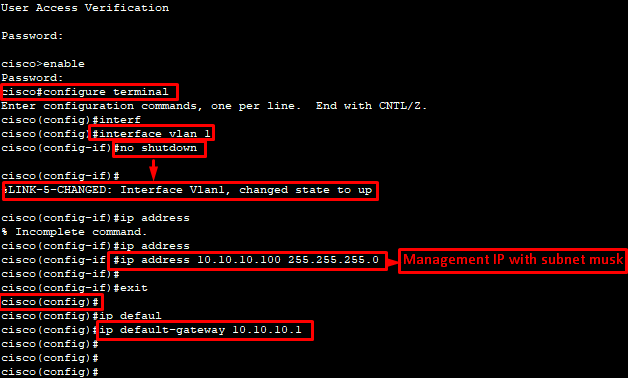
Management IP Set CMD:
User Access Verification
Password:
cisco>enable
Password:
cisco#configure terminal
cisco(config)#interface vlan 1
cisco(config-if)#no shutdown
cisco(config-if)#ip address 10.10.10.100 255.255.255.0
cisco(config-if)#exit
cisco(config)#ip default-gateway 10.10.10.1
Commands in brief:
| CMD | Brief Instruction |
| cisco>enable | This command moves you from user EXEC mode (which has limited commands) to privileged EXEC mode (indicated by the # prompt), allowing you to run higher-level commands. |
| cisco#configure terminal | This is an essential command that takes you into global configuration mode, where you can make changes to the device’s configuration. |
| cisco(config)#interface vlan 1 | This command moves you into the configuration mode for the VLAN 1 SVI. VLAN 1 is the default VLAN on all Cisco switches. By configuring this logical interface, you are essentially giving the entire switch an IP address for management purposes. |
| cisco(config-if)#no shutdown | This command administratively enables the VLAN 1 interface. A VLAN interface will not be “up” unless at least one physical port assigned to that VLAN is also up. While VLAN 1 is typically up by default, this command is a good practice to ensure the logical interface is active. |
| cisco(config-if)#ip address 10.10.10.100 255.255.255.0 | This assigns an IP address and subnet mask to the VLAN 1 interface. This IP address, 10.10.10.100, is the address you’ll use to connect to and manage the switch from a PC or another device on the same network. The subnet mask, 255.255.255.0, defines the size of the network. |
| cisco(config)#ip default-gateway 10.10.10.1 | This command sets the default gateway for the switch. A Layer 2 switch does not have a routing table, so it needs a default gateway to send management traffic to networks outside of its own local subnet. Without this command, you would only be able to manage the switch from a device on the same local network (in this case, the 10.10.10.0/24 network). |
Save running configuration to startup configuration
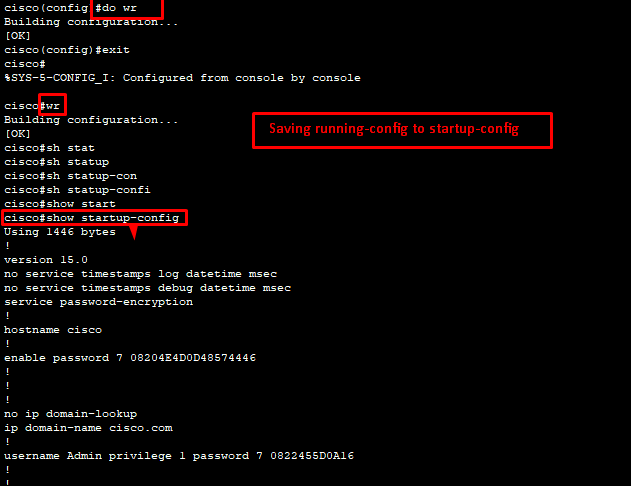
do sh run/do show running-config – to see running configuration
do wr – to save running configuration to start up configuration
do sh start/do show startup-config – to see startup configuration
show startup-config/show running-config/wr – are used in Privilage EXEC Mode.